보안과 관련한 조치에 신경 쓰지 않은 Android Application 이라면 Frida 같은 도구의 사용 방지를 위한 조치가 이루어지지 않을 수 있지만, 반대의 경우라면 Frida 가 동작하고 있는지 검증하여 차단하는 등의 조치가 이루어질 수 있습니다.
이 번에는 ANDITER 에서 Frida 검증과 관련된 우회 실습 내용을 다루어보도록 하겠습니다.
사전 환경구성 확인
우선 앞서 구성한 Nox 가 정상적으로 가동하고 있고, adb 연결이 정상적으로 되고 있는 환경인지 확인해볼 필요가 있습니다. nox_adb 또는 adb 명령어를 이용해 아래와 같이 devices 연결 여부를 확인해봅니다. devices 목록이 나타나면 연결이 된 상태고, 그렇지 않다면 앞서 과정에서 다루었던 내용을 참고하여 연결 상태를 확보합니다.
PS D:\frida> nox_adb devices
List of devices attached
127.0.0.1:62xxx device
nox_adb 또는 adb 를 이용해 devices 목록을 나열했을 때, 실습할 환경이 목록에 나타나야 합니다.
연결이 된 상태이고 기존 실습을 진행하면서 이미 frida server 가 연결된 상태라면 frida server 실행을 생략해도 되지만, 만약 다시 실습을 진행하여 frida server 가 구동 되지 않은 상태라면 아래와 같이 devices 의 shell 에 접속하여 frida server를 가동해 주어야 합니다.
PS D:\frida> nox_adb shell
star2lte:/ # su
:/ # cd /data/local/tmp
:/data/local/tmp # ls
frida-server-16.7.0-android-x86_64 perfd
:/data/local/tmp # ./frida-server-16.7.0-android-x86_64 &
[1] 3310
:/data/local/tmp #
nox 또는 실습 기기에서 frida server 가 실행되어 있지 않다면, 실행을 해주셔야 합니다.
Frida 검증 관련 코드 찾기
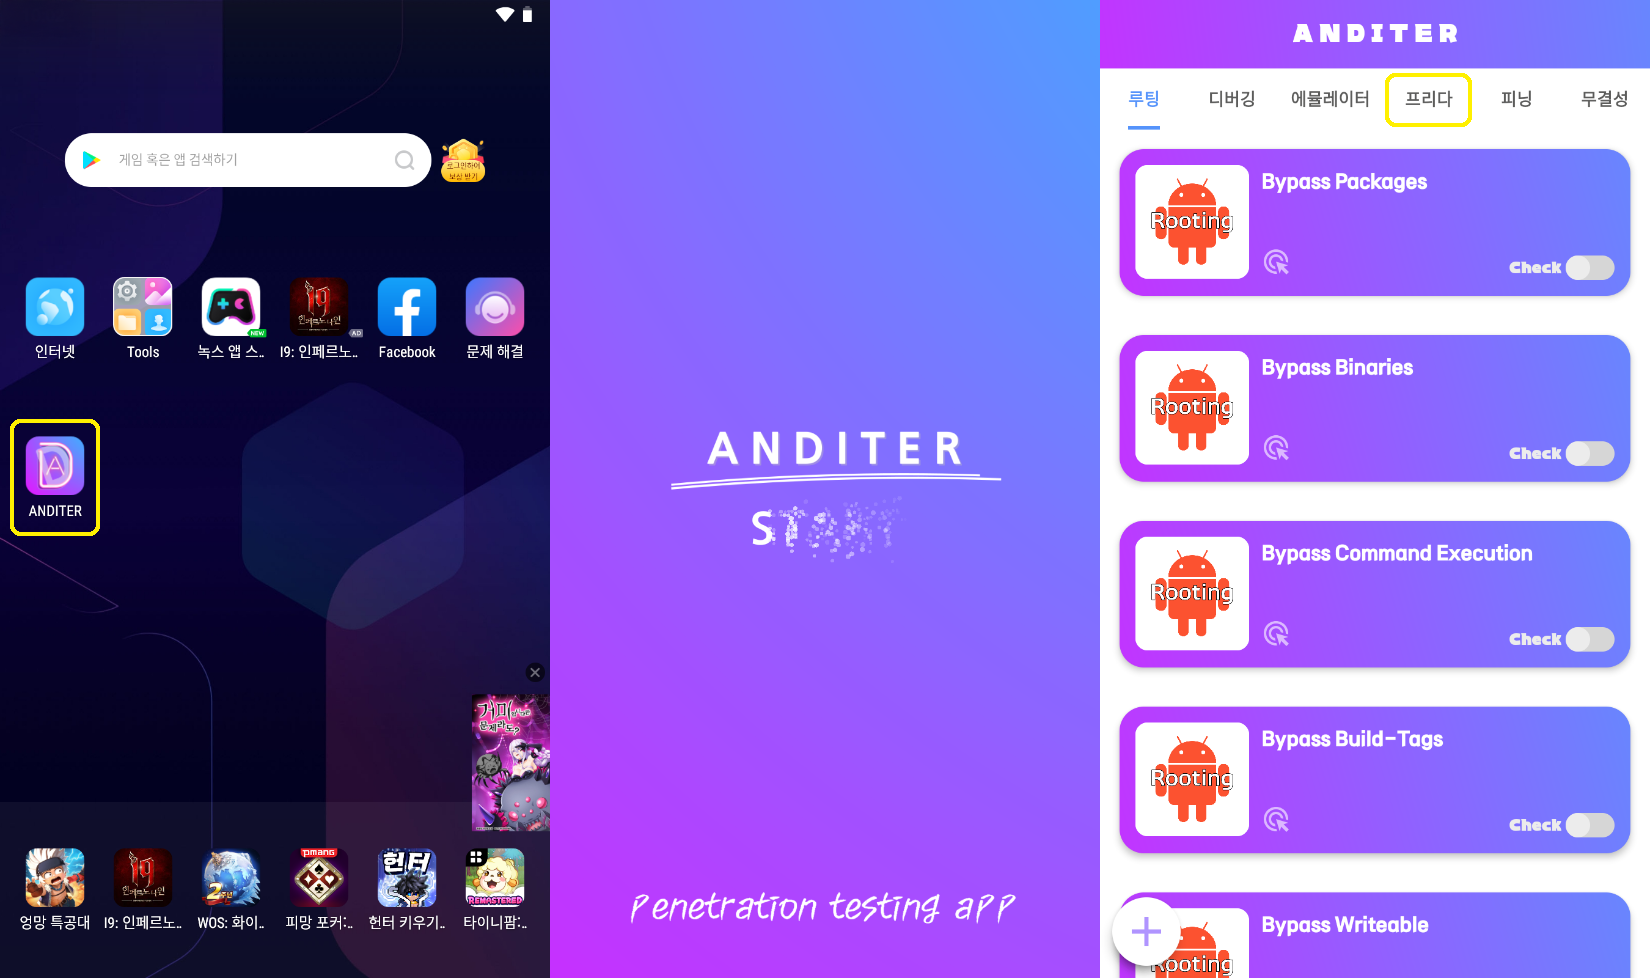
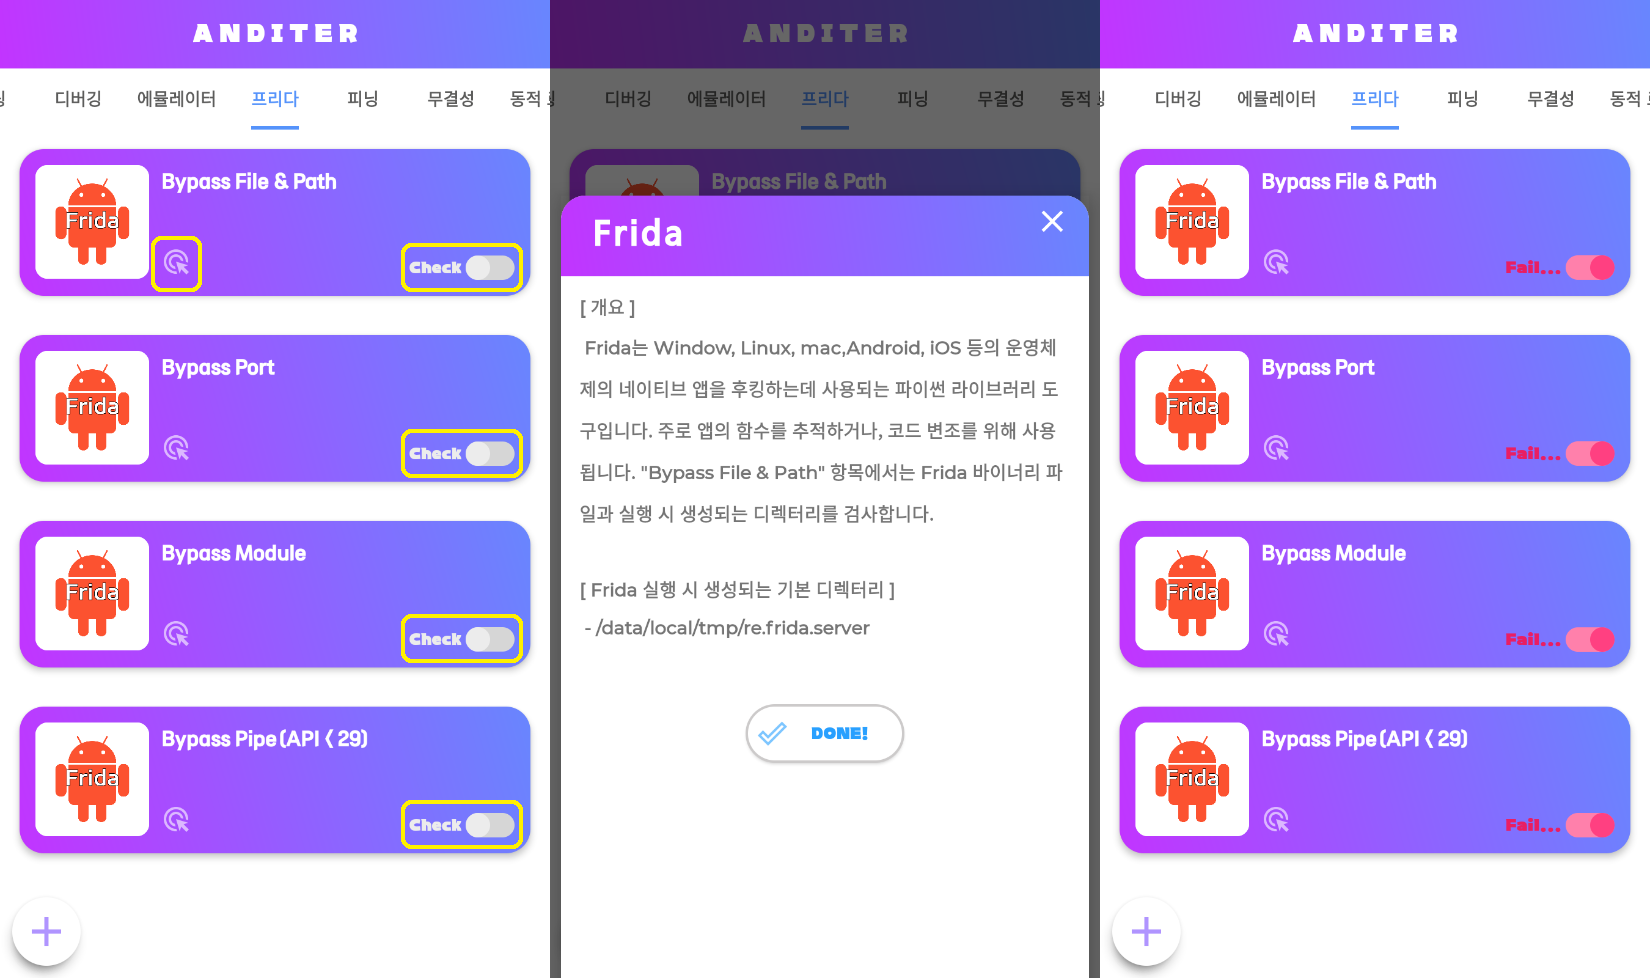
실습 진행을 위해 Antiter를 실행하고 "프리다" 탭을 선택한 뒤, 화면을 보면 Bypass File & Path, Bypass Port, Bypass Module, Bypass Pipe(API < 29) 의 4가지를 실습 항목을 확인 할 수 있고, 해당 항목의 안내를 살펴보면 어떠한 검사를 수행하는지 내용을 확인 할 수 있습니다.
이제 앱의 코드를 살펴볼 텐데 우리의 실습은 Anditer(난독화 미적용 버전).apk을 대상으로 진행되니 Bytecode Viewer에서 Frida를 검색하는 것 만으로 어렵지 않게 관련 코드의 위치를 찾을 수 있을 겁니다. 혹여 검색 과정을 생략하고 바로 코드로 넘어가고 싶으신 분들은 com/playground/anditer/FridaDetector.class경로의 코드를 봐주시면 아래와 같은 코드 블럭이 있는 것을 확인할 수 있을 겁니다.
    public FridaDetector(Context context) {
        Intrinsics.checkNotNullParameter(context, "context");
        this.mContext = context;
        this.IP_ADDRESS = "127.0.0.1";
    }
com/playground/anditer/FridaDetector.class 내 FridaDetector 생성자 부분 확인
이제 해당 경로의 클래스를 살펴보면 Anditer 에서 Frida 검증과 관련한 주요 함수로 추정되는 아래 4가지 함수를 찾아볼 수 있습니다.
 public final boolean isCheckFridaBinary() {...}
 public final boolean isCheckFridaModule() {...}
 public final boolean isCheckFridaPipe() {...}
 public final boolean isCheckFridaPort() {...}
Frida 검증과 관련된 함수 4가지
난독화가 되지 않은 코드이니 만큼, 함수명을 통해서도 Binary, Module, Pipe, Port 를 기반으로 검증을 수행하는 것을 알 수 있고 반환 되는 값은 boolean 형태이니 만큼 우리는 함수 자체를 직접적으로 항상 false 로 반환하도록 재정의 하는 처리 방법으로 우회 시도를 해 볼 수 있을 겁니다.
상세한 분석에 앞서 스크립트 작성 겸, 앞서 발견한 함수를 호출 했을 때 반환 되는 값을 확인해보기 위해 아래와 같이 테스트 스크립트를 작성해 봅시다.
// Filename : anditer_bypass_frida.js
setTimeout(function(){
  Java.perform(function (){
    // Android 에서는 UI 관련 객체(Context, Handler, View 등)는 main/UI 쓰레드 안에서만 안전하게 사용가능하므로,
    // Java.scheduleOnMainThread() 를 이용해 MainThread 안에서 동작하도록 작성해야 함.
    Java.scheduleOnMainThread(function () {
      console.log("[*] Running - Anditer : Bypass Frida Script...");

      var ActivityThread = Java.use("android.app.ActivityThread");
      var context = ActivityThread.currentApplication().getApplicationContext();

      var FridaDetector = Java.use("com.playground.anditer.FridaDetector");
      var instance = FridaDetector.$new(context);

      try {

        console.log("[*] getIP_ADDRESS()      : " + instance.getIP_ADDRESS());
        console.log("[*] isCheckFridaBinary() : " + instance.isCheckFridaBinary());
        console.log("[*] isCheckFridaModule() : " + instance.isCheckFridaModule());
        console.log("[*] isCheckFridaPipe()   : " + instance.isCheckFridaPipe());
        console.log("[*] isCheckFridaPort()   : " + instance.isCheckFridaPort());

      } catch (ex) { console.log("[*] Exception : " + ex) }

    });
  });
}, 0);
위와 같이 getIP_ADDRESS, isCheckFridaBinary, isCheckFridaModule, isCheckFridaPipe, isCheckFridaPort 함수를 호출하는 코드를 작성하여 실행해 봅시다.
코드가 작성되었다면 아래와 같이 스크립트를 구동해 봅니다.
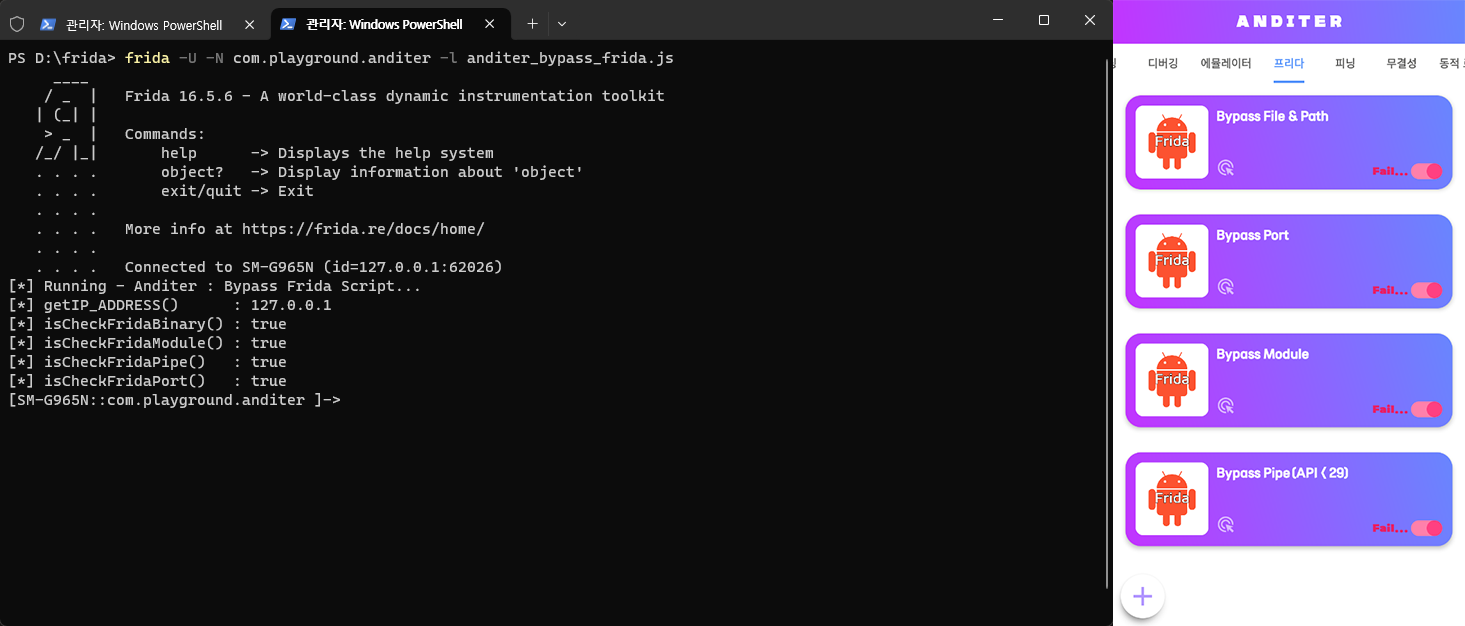
frida -U -N com.playground.anditer -l anditer_bypass_frida.js스크립트를 실행한 결과 isCheckFrida*() 함수의 결과들이 true로 반환되는 것을 확인할 수 있고, Nox 에뮬레이터에서 검증 여부를 확인해보면 Frida 사용이 검출되어 Fail...로 검증을 우회하지 못하였음을 확인할 수 있습니다.
코드 분석으로 검증 우회 방법 모색하기
분석해야 할 대상을 식별했고, 직접적으로 함수를 호출해보며 우회처리를 해야 할 대상임을 명확히 확인하였다면, 이제 코드를 좀 더 상세히 분석하여 어떠한 우회 방법을 시도해 볼 수 있을지 찾아봐야 합니다.
첫 번째, isCheckFridaBinary 함수 분석
    public final boolean isCheckFridaBinary() {
        try {
            String string;
            boolean bl;
            Object object = new File("/data/local/tmp"); // ← File 생성자
            object = ((Sequence)FilesKt.walk$default((File)object, null, 1, null).maxDepth(2)).iterator(); // ← FilesKt 를 고려해볼 수 있지만 넘어간다.
            do {
                if (!object.hasNext()) return false;
                File file = (File)object.next();
                string = file.getName(); // ← 이 부분도 해볼수 있으나 넘어간다.
                Intrinsics.checkNotNullExpressionValue(string, "it.name");
                if (StringsKt.contains$default((CharSequence)string, "frida", false, 2, null)) return true;
                string = file.getName();
                Intrinsics.checkNotNullExpressionValue(string, "it.name");
            } while (!(bl = StringsKt.contains$default((CharSequence)string, "linjector", false, 2, null)));
            return true;
        }
        catch (Exception exception) {
            exception.printStackTrace();
        }
        return false;
    }
isCheckFridaBinary() 함수를 살펴보면 File Class를 이용해 생성자를 호출하는 부분, StringsKt.contains()를 이용해 frida 및 linjector 문구 포함 여부를 검사하는 부분 등이 확인됩니다. 우리는 이 부분들을 인위적으로 변경하여 검증 우회를 시도를 해볼 수 있을 겁니다.
두 번째, isCheckFridaModule 함수 분석
    public final boolean isCheckFridaModule() {
        this.setFile(new File("/proc/self/maps")); // ← File 생성자
        boolean bl = false;
        try {
            boolean bl2;
            FileReader fileReader = new FileReader(this.isFile());
            Object object = new BufferedReader(fileReader); // ← BufferdReader 생성자
            object = ((Iterable)TextStreamsKt.readLines((Reader)object)).iterator();
            do {
                bl2 = bl;
                if (!object.hasNext()) return bl2;
            } while (!(bl2 = StringsKt.contains$default((CharSequence)((String)object.next()), "frida", false, 2, null)));
            return true;
        }
        catch (Exception exception) {
            return bl;
        }
    }
isCheckFridaModule() 함수를 분석하는 과정에서도 File Class 이용해 생성자를 호출하는 부분은 동일하게 발견되고, BufferedReader Class 의 생성자를 호출하는 부분과 StringsKt.contains() 등의 처리 로직을 변경하여 검증 우회를 시도 해볼 수 있을 겁니다.
세 번째, isCheckFridaPipe 함수 분석
    public final boolean isCheckFridaPipe() {
        if (Build.VERSION.SDK_INT >= 29) {
            new CustomAlert(this.mContext).smaliDialog("\uc54c\ub9bc", "\uc548\ub4dc\ub85c\uc774\ub4dc 9 \ubc84\uc804 \uc774\ud558\uc5d0\uc11c \uc0ac\uc6a9 \uac00\ub2a5\ud569\ub2c8\ub2e4.", "Frida");
            return false;
        }
        BufferedReader bufferedReader = new BufferedReader(new InputStreamReader(Runtime.getRuntime().exec(new String[]{"netstat", "|", "grep frida"}).getInputStream())); // ← BufferedReader 생성자
        String string = TextStreamsKt.readText(bufferedReader); // ← readText를 변조해볼 수 도 있다
        bufferedReader.close();
        if (string == null) return false;
        if (Intrinsics.areEqual(string, "")) return false;
        return true;
    }
isCheckFridaPipe() 함수에서는 netstat 및 grep frida 로 파이프라인을 검사하는 방법으로 진행되는 것으로 보이는데, "netstat", "|", "grep frida" 처리를 받는 Runtime.exe(), BufferedReader Class 등을 변조하여 우회 시도를 해볼 수 있을 겁니다.
네 번째, isCheckFridaPort 함수 분석
    public final boolean isCheckFridaPort() {
        Ref.BooleanRef booleanRef = new Ref.BooleanRef();
        Thread thread = new Thread(new Runnable(this, booleanRef){
            final Ref.BooleanRef $result$inlined;
            final FridaDetector this$0;
            {
                this.this$0 = fridaDetector;
                this.$result$inlined = booleanRef;
            }

            /*
             * Unable to fully structure code
             */
            public final void run() {
                var1_1 = 27000;
                block2: while (var1_1 < 27501) {
                    try {
                        var2_2 = new Socket(this.this$0.getIP_ADDRESS(), var1_1);
                        if (var2_2.isConnected()) {
                            this.$result$inlined.element = true;
                            break;
                        }
lbl8:
                        // 3 sources

                        while (true) {
                            ++var1_1;
                            continue block2;
                            break;
                        }
                    }
                    catch (Exception var2_3) {
                        ** continue;
                    }
                }
                return;
            }
        });
        thread.start();
        thread.join();
        return booleanRef.element;
    }
isCheckFridaPort() 함수에서는 Runnable.run() 과 Socket Class 및 Socket.isConnected() 호출 부분이 확인되고 이 부분들을 변조하여 공략하는 방법으로 검증을 우회 시도를 해볼 수 있을 겁니다.
시도해 볼 우회 방법 요약
분석한 내용을 토대로 중복된 내용은 일부 정리하고 걸러낸다면 우리가 검증 우회를 위해 시도해볼 만한 부분은 다음과 같은 방법들로 추려질 수 있을 겁니다.
- 함수들 자체의 반환 값을 변조하여 우회 시도
- File Class의 생성자에 넘겨지는 값을 변조하여 우회 시도
- StringsKt.contains 호출시 넘겨지는 키워드가 frida 이거나 linjector 일 경우 false를 반환하도록 하여 우회 시도
- BufferedReader Class의 생성자에 넘겨지는 값을 변조하여 우회 시도
- Socket Class 생성자 또는 isConnected 함수의 값을 변조하여 우회 시도
우회 코드 작성하기
자, 이제 우회를 위한 실습 코드를 작성해 봅시다. 앞서 언급한 5가지 방법을 순차적 그리고 부분적으로 다루어 보면 다음과 같은 코드들이 나올 수 있습니다. 다만, 아래의 코드는 예시일 뿐 사람에 따라서 또 다른 방법들도 존재할 수 있다는 것을 염두에 두고 자신이라면 어떻게 접근하고 작성하여 우회를 시도하고 성공시킬지 고민해보는 것이 가장 중요한 부분이라는 것을 잊지 않아야 합니다.
방법 1 : 함수들 자체의 반환 값을 변조하여 우회 시도
분석 과정에서 확인한 검증을 위해 호출되는 함수 4가지 모두 boolean 형태의 값을 반환하도록 되어 있으므로, 가장 직접적이면서도 단순한 방법으로 호출되는 함수의 반환 값을 항상 false 로 반환하도록 하여 우회하는 방법을 시도해 볼 수 있습니다. 이에 다음과 같이 각각의 함수를 후킹(Hooking)하여 항상 false 값을 반환하도록 스크립트를 작성합니다.
setTimeout(function(){
  Java.perform(function (){
    var FridaDetector = Java.use("com.playground.anditer.FridaDetector");
    console.log("[*] Running - Anditer : Bypass Frida Script...");
    // isCheckFridaBinary() 호출시 false 로 반환 되도록 Hooking
    FridaDetector.isCheckFridaBinary.implementation = function() {
      try {
        console.log("[*] Hooked com.playground.anditer.FridaDetector.isCheckFridaBinary() called!");
        return false;
      } catch (ex) { console.log("[*] Exception : " + ex); return false; }
    }
    // isCheckFridaModule() 호출시 false 로 반환 되도록 Hooking
    FridaDetector.isCheckFridaModule.implementation = function() {
      try {
        console.log("[*] Hooked com.playground.anditer.FridaDetector.isCheckFridaModule() called!");
        return false;
      } catch (ex) { console.log("[*] Exception : " + ex); return false; }
    }
    // isCheckFridaPipe() 호출시 false 로 반환 되도록 Hooking
    FridaDetector.isCheckFridaPipe.implementation = function() {
      try {
        console.log("[*] Hooked com.playground.anditer.FridaDetector.isCheckFridaPipe() called!");
        return false;
      } catch (ex) { console.log("[*] Exception : " + ex); return false; }
    }
    // isCheckFridaPort() 호출시 false 로 반환 되도록 Hooking
    FridaDetector.isCheckFridaPort.implementation = function() {
      try {
        console.log("[*] Hooked com.playground.anditer.FridaDetector.isCheckFridaPort() called!");
        return false;
      } catch (ex) { console.log("[*] Exception : " + ex); return false; }
    }
    // Android App 에서는 isCheckFridaPort() 로 호출되지 않고 Runnable에 영향을 받기 때문에 Runnable의 Run()을 대상으로 Hooking
    var RunnableImpl = Java.use("com.playground.anditer.FridaDetector$isCheckFridaPort$$inlined$Runnable$1");
    RunnableImpl.run.implementation = function () {
      console.log("[*] Hooked Runnable.run() in com.playground.anditer.FridaDetector.isCheckFridaPort() called!");
      return;
    }
    // Android 에서는 UI 관련 객체(Context, Handler, View 등)는 main/UI 쓰레드 안에서만 안전하게 사용가능하므로,
    // Java.scheduleOnMainThread() 를 이용해 MainThread 안에서 동작하도록 작성해야 함.
    Java.scheduleOnMainThread(function () {
      try {
        var context = Java.use("android.app.ActivityThread").currentApplication().getApplicationContext();
        var instance = FridaDetector.$new(context);

        console.log("")
        console.log("[*] isCheckFridaBinary() : " + instance.isCheckFridaBinary());
        console.log("[*] isCheckFridaModule() : " + instance.isCheckFridaModule());
        console.log("[*] isCheckFridaPipe()   : " + instance.isCheckFridaPipe());
        console.log("[*] isCheckFridaPort()   : " + instance.isCheckFridaPort());
        console.log("")

      } catch (ex) { console.log("[*] Exception : " + ex); }
    });
  });
}, 0);
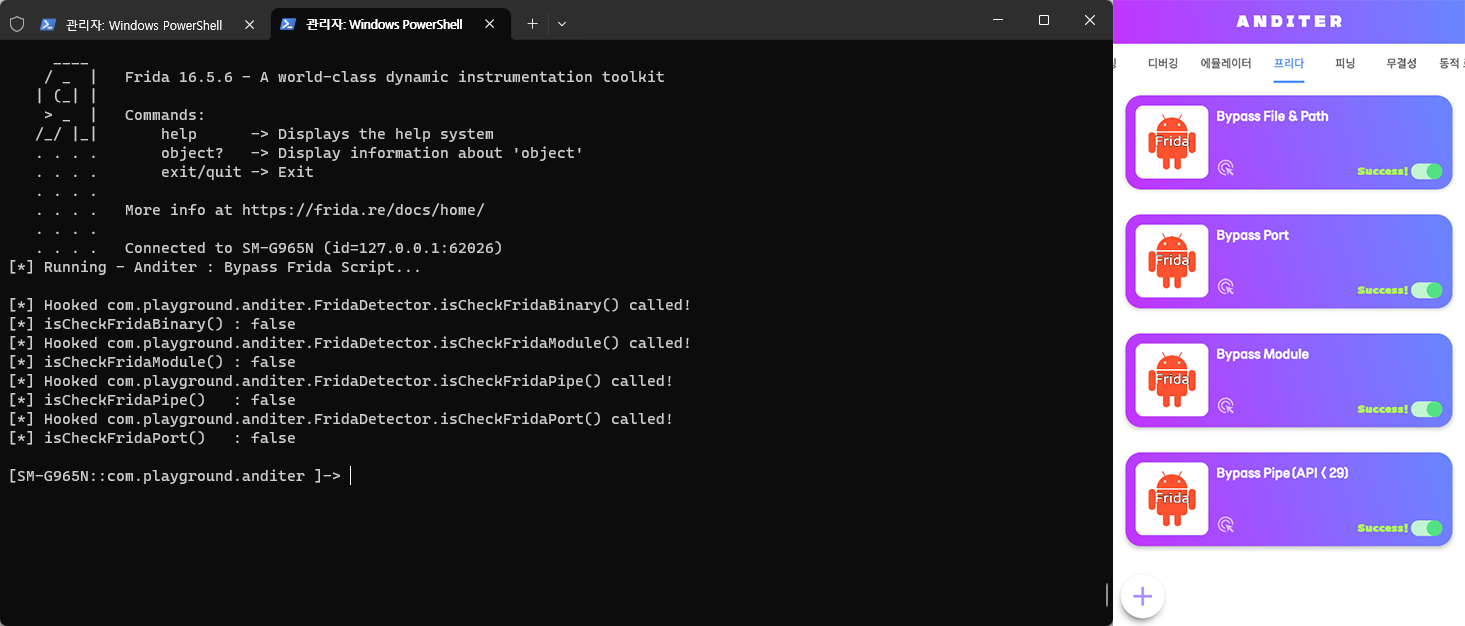
작성한 스크립트를 실행시키면 아래와 같이 호출 값이 false 로 나타나며, 각각 frida 검출 결과 값이 false 인 것을 보면, 우회에 성공한 것으로 예상할 수 있고 실제로 Anditer 앱에서 Check 부분을 클릭 및 선택하여 확인해보면 Success 로 검증이 모두 통과 되는 모습을 확인할 수 있을 겁니다.
방법 2: File Class의 생성자에 넘겨지는 값을 변조하여 우회 시도
또 다른 방법으로 4개의 함수에 대해 직접적인 후킹을 하지 않은 상태에서, isCheckFridaBinary() 와 isCheckFridaModule() 에서 공통적으로 호출하고 있는 File Class의 생성자를 조작하여 우회하는 방법을 시도해 볼 수 있을 겁니다.
// public final boolean isCheckFridaBinary()
Object object = new File("/data/local/tmp");

// public final boolean isCheckFridaModule()
this.setFile(new File("/proc/self/maps"));
/data/local/tmp 의 경로의 경우 디렉토리로 경로 내의 파일들을 검출하는 것으로 볼 수 있고, /proc/self/maps 경로의 경우 프로세스 자기 자신의 메모리 주소 목록을 확인할 수 있도록 하고 있으므로, 각각의 경로에서 정보를 재대로 얻지 못한다면 바르지 못한 정보로 인해 검증을 우회 해 볼 수 있을 것입니다. 따라서 생성자에서 /dev/null 경로의 값을 읽도록 하면 아무런 값을 얻지 못할 테니 우회가 가능할 겁니다.
setTimeout(function(){
  Java.perform(function (){
    var FridaDetector = Java.use("com.playground.anditer.FridaDetector");
    console.log("[*] Running - Anditer : Bypass Frida Script...");

    var File = Java.use("java.io.File");
    File.$init.overload('java.lang.String').implementation = function (path) {
      try {
        return this.$init('/dev/null');
      } catch (ex) { console.log("[*] Exception : " + ex); return false; }
    }
    // Android 에서는 UI 관련 객체(Context, Handler, View 등)는 main/UI 쓰레드 안에서만 안전하게 사용가능하므로,
    // Java.scheduleOnMainThread() 를 이용해 MainThread 안에서 동작하도록 작성해야 함.
    Java.scheduleOnMainThread(function () {
      try {
        var context = Java.use("android.app.ActivityThread").currentApplication().getApplicationContext();
        var instance = FridaDetector.$new(context);

        console.log("")
        console.log("[*] isCheckFridaBinary() : " + instance.isCheckFridaBinary());
        console.log("[*] isCheckFridaModule() : " + instance.isCheckFridaModule());
        console.log("[*] isCheckFridaPipe()   : " + instance.isCheckFridaPipe());
        console.log("[*] isCheckFridaPort()   : " + instance.isCheckFridaPort());
        console.log("")

      } catch (ex) { console.log("[*] Exception : " + ex); }
    });
  });
}, 0);
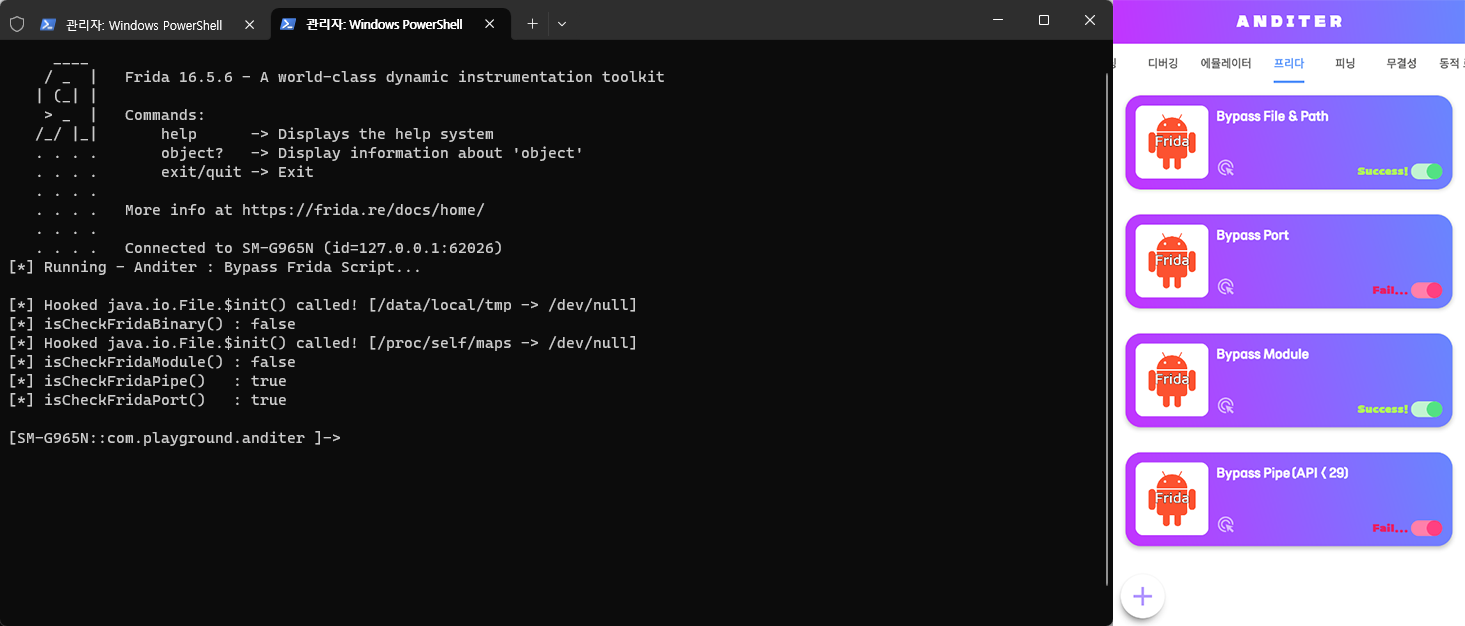
목적에 맞추어 위와 같이 File 생성자 호출시 /dev/null 경로를 참조하는 객체가 생성되도록 작성하여 실행하면 다음과 같이 Bypass File & Path 와 Bypass Module 두 가지 Check 부분에서 Success! 메시지가 나타나는 모습을 확인할 수 있을 겁니다.
방법 3: StringsKt.contains 호출시 넘겨지는 키워드가 frida 이거나 linjector 일 경우 false를 반환하도록 하여 우회 시도
세 번째 방법으로 isCheckFridaBinary()와 isCheckFridaModule()에서 호출하고 있는 StringsKt.contains(...)로 호출되는 부분을 살펴보면 다음과 같이 frida 와 linjector 키워드를 검출하여 검증을 수행하고 있는 코드를 확인할 수 있습니다.
// public final boolean isCheckFridaBinary()
if (StringsKt.contains$default((CharSequence)string, "frida", false, 2, null)) return true;
...
while (!(bl = StringsKt.contains$default((CharSequence)string, "linjector", false, 2, null)))

// public final boolean isCheckFridaModule()
while (!(bl2 = StringsKt.contains$default((CharSequence)((String)object.next()), "frida", false, 2, null)))
원래의 문자열에서 2번째 문자열을 검증 값으로 사용하는 형태를 추가적으로 추적 및 분석하여 다음과 같이 스크립트를 작성하여 동작을 확인해봅시다.
setTimeout(function(){
  Java.perform(function (){
    var FridaDetector = Java.use("com.playground.anditer.FridaDetector");
    console.log("[*] Running - Anditer : Bypass Frida Script...");

    var StringsKt = Java.use("kotlin.text.StringsKt");
    StringsKt.contains.overload('java.lang.CharSequence', 'java.lang.CharSequence', 'boolean').implementation = function (text, keyword, ignoreCase) {
      try {
        if (/frida|linjector/.test(String(keyword).toLowerCase())) {
          console.log("[*] Hooked kotlin.text.StringsKt.contains(...) called!");
          console.log("    [" + text + "/" + keyword + "]");
          return false;
        }
        return original.call(this, text, keyword, ignoreCase);
      } catch (ex) { console.log("[*] Exception : " + ex); return false; }
    }
    // Android 에서는 UI 관련 객체(Context, Handler, View 등)는 main/UI 쓰레드 안에서만 안전하게 사용가능하므로,
    // Java.scheduleOnMainThread() 를 이용해 MainThread 안에서 동작하도록 작성해야 함.
    Java.scheduleOnMainThread(function () {
      try {
        var context = Java.use("android.app.ActivityThread").currentApplication().getApplicationContext();
        var instance = FridaDetector.$new(context);

        console.log("")
        console.log("[*] isCheckFridaBinary() : " + instance.isCheckFridaBinary());
        console.log("[*] isCheckFridaModule() : " + instance.isCheckFridaModule());
        console.log("[*] isCheckFridaPipe()   : " + instance.isCheckFridaPipe());
        console.log("[*] isCheckFridaPort()   : " + instance.isCheckFridaPort());
        console.log("")

      } catch (ex) { console.log("[*] Exception : " + ex); }
    });
  });
}, 0);
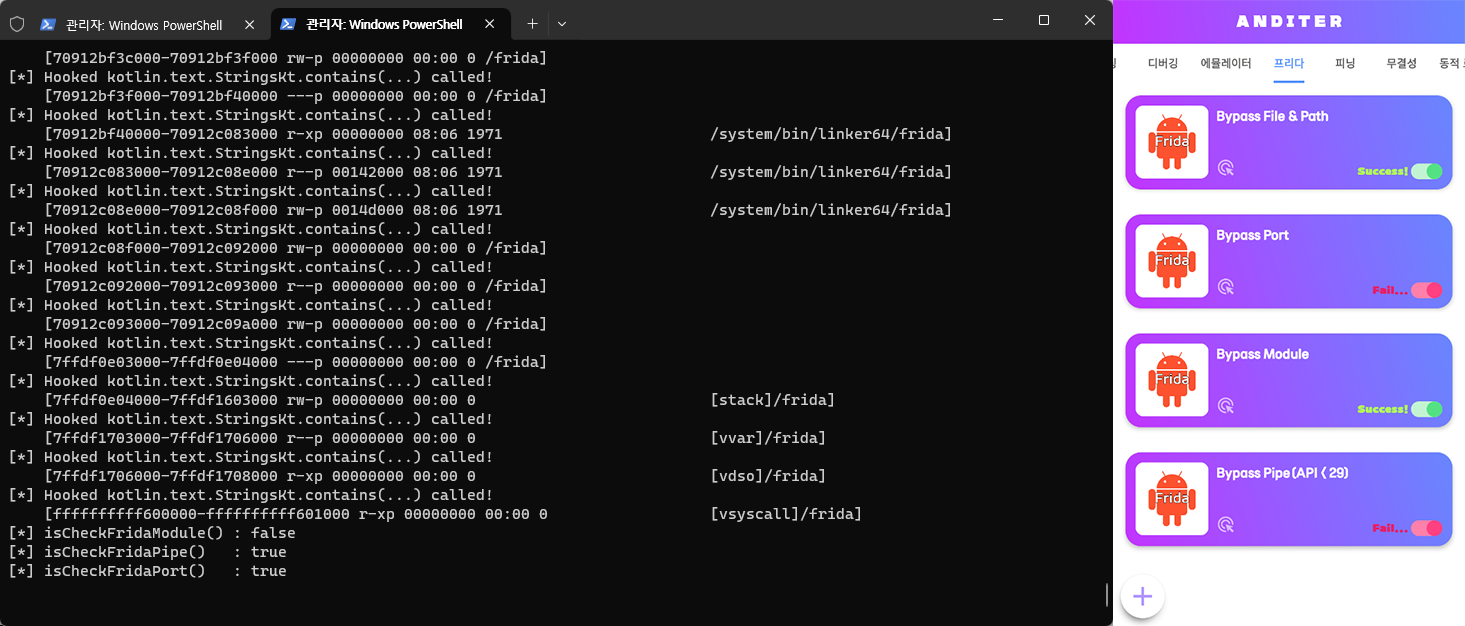
앞서와 좀 달라진 결과로는 contains 가 반복적으로 호출됨에 따라 여러줄의 로그가 나타나는 것을 확인해 볼 수 있고 Anditer 화면에서는 전과 동일하게 Bypass File & Path 와 Bypass Module 두 가지 Check 부분에서 Success! 메시지가 나타나는 모습을 확인할 수 있을 겁니다.
방법 4: BufferedReader Class의 생성자에 넘겨지는 값을 변조하여 우회 시도
네 번째 방법으로 isCheckFridaModule 와 isCheckFridaPipe 에서 호출하고 있는 BufferedReader Class의 생성자를 조작하는 방법을 검토해볼 수 있습니다.
// public final boolean isCheckFridaModule()
Object object = new BufferedReader(fileReader);

// public final boolean isCheckFridaPipe()
BufferedReader bufferedReader = new BufferedReader(new InputStreamReader(Runtime.getRuntime().exec(new String[]{"netstat", "|", "grep frida"}).getInputStream()));
각 함수에서 BufferedReader에 담겨진 값을 읽어 들여 frida 문구가 있는지 검출하는 형태를 갖추고 있는 만큼, BufferedReader 내부에 담겨진 값을 File Class 때와 동일하게 빈 값으로 채워줄 수 있다면 검증을 우회할 수 있을 것이기에 아래와 같이 스크립트를 작성하고 스크립트를 적용해보겠습니다.
setTimeout(function(){
  Java.perform(function (){
    var FridaDetector = Java.use("com.playground.anditer.FridaDetector");
    console.log("[*] Running - Anditer : Bypass Frida Script...");

    var BufferedReader = Java.use("java.io.BufferedReader");
    BufferedReader.$init.overload("java.io.Reader", "int").implementation = function (arg1, arg2) {
      try {
        console.log("[*] Hooked java.io.BufferedReader(java.io.Reader) called! [Args:" + arg1 + "]"); //arg1.getClass().getName()
        var fr = Java.use("java.io.FileReader").$new("/dev/null");
        return this.$init(fr, arg2);
      } catch (ex) { console.log("[*] Exception : " + ex); return this.$init(fr, arg2); }
    }
    // Android 에서는 UI 관련 객체(Context, Handler, View 등)는 main/UI 쓰레드 안에서만 안전하게 사용가능하므로,
    // Java.scheduleOnMainThread() 를 이용해 MainThread 안에서 동작하도록 작성해야 함.
    Java.scheduleOnMainThread(function () {
      try {
        var context = Java.use("android.app.ActivityThread").currentApplication().getApplicationContext();
        var instance = FridaDetector.$new(context);

        console.log("")
        console.log("[*] isCheckFridaBinary() : " + instance.isCheckFridaBinary());
        console.log("[*] isCheckFridaModule() : " + instance.isCheckFridaModule());
        console.log("[*] isCheckFridaPipe()   : " + instance.isCheckFridaPipe());
        console.log("[*] isCheckFridaPort()   : " + instance.isCheckFridaPort());
        console.log("")

      } catch (ex) { console.log("[*] Exception : " + ex); }
    });
  });
}, 0);
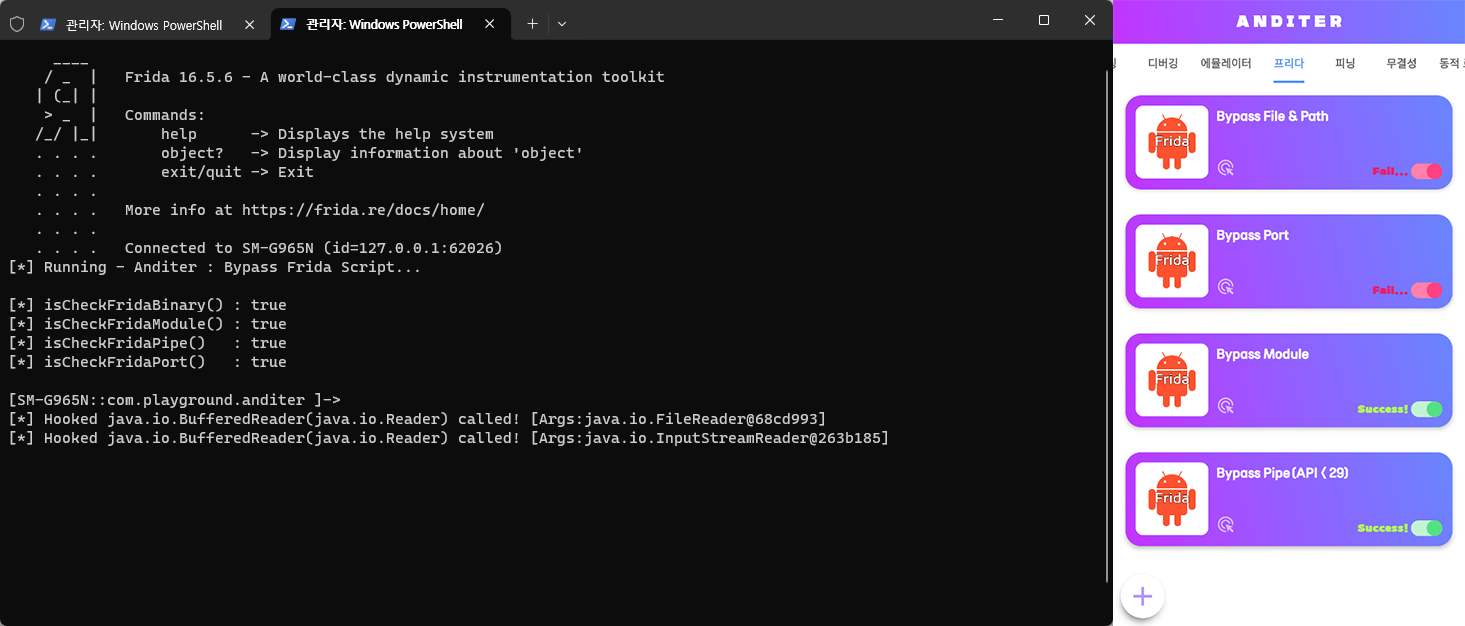
스크립트 실행 결과 메인쓰레드(OnMainThread) 에서 호출된 함수에서는 검증을 우회하지 못한듯한 결과를 보여주는데 Anditer 앱 내에서 Bypass Module 및 Bypass Pipe (API < 29) 에서는 Check 부분에서 Success! 메시지가 나타나며 검증 우회에 성공한 모습을 보여줍니다. (이러한 차이가 나는 것은 Frida 에서 별도로 Proxy 처리를 하고 있거나 메모리 상에서 호출되는 경로 등이 달라져서 후킹 적용 여부가 달라져서 이러한 결과 차이가 나타날 수 있습니다.)
방법 5: Socket Class 생성자 또는 isConnected 함수의 값을 변조하여 우회 시도
다섯 번째 방법으로는 isCheckFridaPort 에서 호출하고 있는 Socket 처리를 변조하는 방법으로 생성자에서 IP Address 및 포트번호인 var1_1 변수를 임의로 변경하거나 또는 isConnected() 의 값을 항상 false 로 반환하도록 하여 검증을 우회 할 수 있도록 스크립트를 작성해 볼 수 있을 겁니다.
// public final boolean isCheckFridaPort()
...
public final void run() {
  var1_1 = 27000;
  block2: while (var1_1 < 27501) {
    ...
    var2_2 = new Socket(this.this$0.getIP_ADDRESS(), var1_1);
    if (var2_2.isConnected()) {
    ...
setTimeout(function(){
Java.perform(function (){
var FridaDetector = Java.use("com.playground.anditer.FridaDetector");
console.log("[*] Running - Anditer : Bypass Frida Script...");
var Socket = Java.use("java.net.Socket");
Socket.$init.overload("java.lang.String", "int").implementation = function (addr, port) {
try {
if (port >= 27000 && port <= 27042) {
//console.log("[*] Hooked java.net.Socket(java.lang.String, int) called! [ " + addr + " / " + port + " ]");
return this.$init(addr, 52525);
}
return this.$init(addr, port);
} catch (ex) { }
}
Socket.isConnected.implementation = function () {
//console.log("[*] Hooked java.net.Socket.isConnected() called!");
return false;
}
// Android 에서는 UI 관련 객체(Context, Handler, View 등)는 main/UI 쓰레드 안에서만 안전하게 사용가능하므로,
// Java.scheduleOnMainThread() 를 이용해 MainThread 안에서 동작하도록 작성해야 함.
Java.scheduleOnMainThread(function () {
try {
var context = Java.use("android.app.ActivityThread").currentApplication().getApplicationContext();
var instance = FridaDetector.$new(context);
console.log("")
console.log("[*] isCheckFridaBinary() : " + instance.isCheckFridaBinary());
console.log("[*] isCheckFridaModule() : " + instance.isCheckFridaModule());
console.log("[*] isCheckFridaPipe() : " + instance.isCheckFridaPipe());
console.log("[*] isCheckFridaPort() : " + instance.isCheckFridaPort());
console.log("")
} catch (ex) { console.log("[*] Exception : " + ex); }
});
});
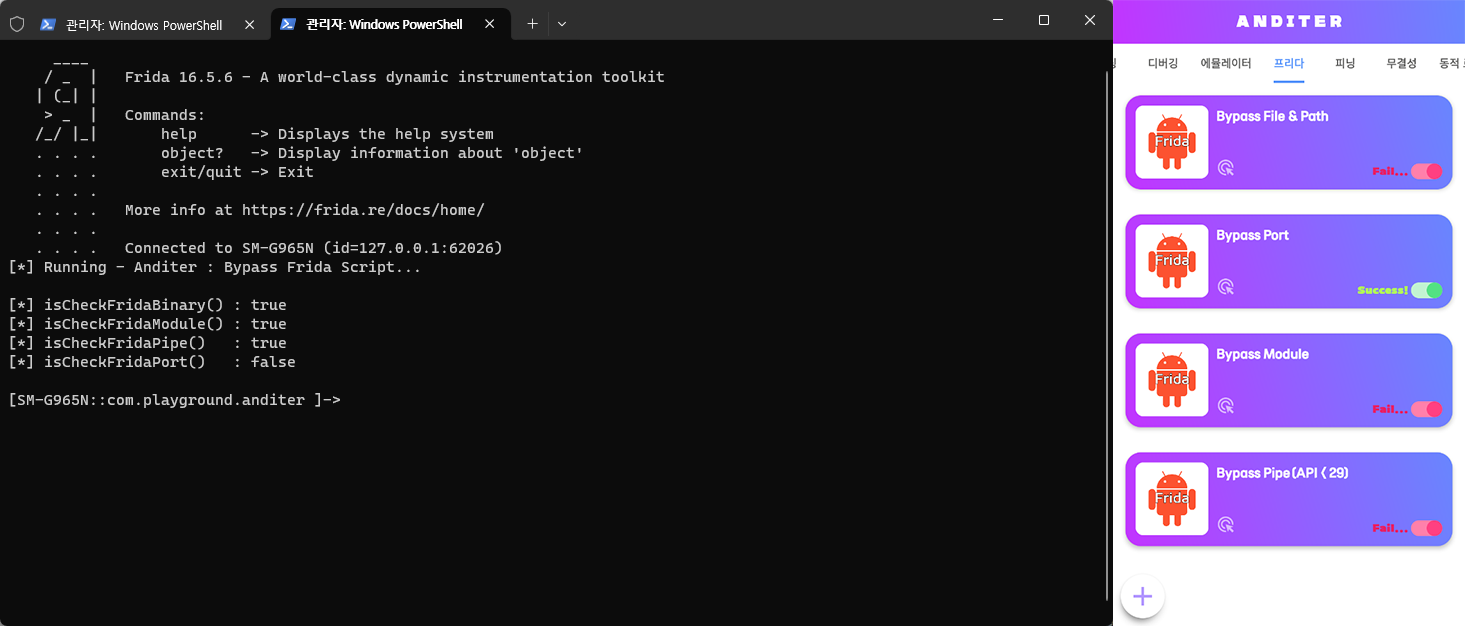
}, 0);위의 코드에서 호출 될 때의 로그가 너무 많아질 수 있어 호출된 로그를 주석 처리 해두었으니 실습 과정에서 해당 주석을 제거하고 실행해보면 세부적인 확인이 가능할 것이구요. 코드를 수정하지 않고 실행하여 결과를 확인해보면 아래와 같이 isCheckFridaPort 검증 우회에 성공하고 Anditer 앱에서도 Bypass Port 의 Check 가 Success! 메시지로 바뀌어 실제 검증 우회에 성공한 모습을 확인할 수 있을겁니다.
정리
이번 과정에서는 Frida 동작 여부를 검출하는 4가지의 검증 방식을 대상으로 코드를 분석하고 우회하는 스크립트를 작성하여 정상적으로 우회가 되는지 시도해보는 실습을 진행했습니다.
이러한 실습과정을 통해서 동일하거나 유사한 상황을 접하게 될 경우 자기 자신이라면 어떻게 접근하고 분석하며 문제를 해결해 나갈지 생각해 보고 경험을 쌓는 것에 의미와 가치를 두고 실습해보면 좋을 것 같습니다. 조금더 심화 학습을 해보고 싶으신 분들은 난독화 처리가 된 버전으로 추가적인 실습을 해보면 좋겠다는 말씀으로 본 내용은 마무리 하겠습니다.
실습용 코드
아래는 별도로 제가 작성해둔 실습용 코드를 올려 놓으니, 앞서 실습했던 방식과 유사하게 스위치 변수를 true / false 로 바꾸어 가며 Antiter 를 재실행하고 스크립트를 동작해보면서 스크립트의 동작 과정 또는 새로운 스크립트의 작성의 참고용으로 활용하시면 되겠습니다.
/*
  frida -U -N <com.playground.anditer> -l anditer_bypass_frida.js [--no-pause]
*/

setTimeout(function(){
  Java.perform(function (){
    var FridaDetector = Java.use("com.playground.anditer.FridaDetector");
    console.log("[*] Running - Anditer : Bypass Frida Script...");

    // Bypass 검증용 스위치 변수
    var functionBypass  = false   // 영향 받는 Method : isCheckFridaBinary, isCheckFridaModule, isCheckFridaPipe, isCheckFridaPort
    var fileBypass      = false   // 영향 받는 Method : isCheckFridaBinary, isCheckFridaModule
    var stringsKTBypass = false   // 영향 받는 Method : isCheckFridaBinary, isCheckFridaModule
    var bufReaderBypass = false   // 영향 받는 Method : isCheckFridaModule, isCheckFridaPipe
    var socketBypass    = false   // 영향 받는 Method : isCheckFridaPort

    // 함수 자체를 Hooking 하여 Frida 검증 우회 (Target : isCheckFridaBinary, isCheckFridaModule, isCheckFridaPipe, isCheckFridaPort)
    if (functionBypass) {
      // isCheckFridaBinary() 호출시 false 로 반환 되도록 Hooking
      FridaDetector.isCheckFridaBinary.implementation = function() {
        try {
          console.log("[*] Hooked com.playground.anditer.FridaDetector.isCheckFridaBinary() called!");
          return false;
        } catch (ex) { console.log("[*] Exception : " + ex); return false; }
      }
      // isCheckFridaModule() 호출시 false 로 반환 되도록 Hooking
      FridaDetector.isCheckFridaModule.implementation = function() {
        try {
          console.log("[*] Hooked com.playground.anditer.FridaDetector.isCheckFridaModule() called!");
          return false;
        } catch (ex) { console.log("[*] Exception : " + ex); return false; }
      }
      // isCheckFridaPipe() 호출시 false 로 반환 되도록 Hooking
      FridaDetector.isCheckFridaPipe.implementation = function() {
        try {
          console.log("[*] Hooked com.playground.anditer.FridaDetector.isCheckFridaPipe() called!");
          return false;
        } catch (ex) { console.log("[*] Exception : " + ex); return false; }
      }
      // isCheckFridaPort() 호출시 false 로 반환 되도록 Hooking
      FridaDetector.isCheckFridaPort.implementation = function() {
        try {
          console.log("[*] Hooked com.playground.anditer.FridaDetector.isCheckFridaPort() called!");
          return false;
        } catch (ex) { console.log("[*] Exception : " + ex); return false; }
      }
      // Android App 에서는 isCheckFridaPort() 로 호출되지 않고 Runnable에 영향을 받기 때문에 Runnable의 Run()을 대상으로 Hooking
      var RunnableImpl = Java.use("com.playground.anditer.FridaDetector$isCheckFridaPort$$inlined$Runnable$1");
      RunnableImpl.run.implementation = function () {
        console.log("[*] Hooked Runnable.run() in com.playground.anditer.FridaDetector.isCheckFridaPort() called!");
        return;
      }
    }

    // File class 를 Hooking 하여 Frida 검증 우회 (Target : isCheckFridaBinary, isCheckFridaModule)
    if (fileBypass) {
      var File = Java.use("java.io.File");
      File.$init.overload('java.lang.String').implementation = function (path) {
        try {
          console.log("[*] Hooked java.io.File.$init() called! [" + path + " -> /dev/null]");
          return this.$init('/dev/null');
        } catch (ex) { console.log("[*] Exception : " + ex); return false; }
      }
    }

    // stringsKTBypass Cotains 를 Hooking 하여 Frida 검증 우회 (Target: isCheckFridaBinary, isCheckFridaModule)
    if (stringsKTBypass) {
      var StringsKt = Java.use("kotlin.text.StringsKt");
      StringsKt.contains.overload('java.lang.CharSequence', 'java.lang.CharSequence', 'boolean').implementation = function (text, keyword, ignoreCase) {
        try {
          if (/frida|linjector/.test(String(keyword).toLowerCase())) {
            //console.log("[*] Hooked kotlin.text.StringsKt.contains(...) called!");
            //console.log("    [" + text + "/" + keyword + "]");
            return false;
          }
          return original.call(this, text, keyword, ignoreCase);
        } catch (ex) { console.log("[*] Exception : " + ex); return false; }
      }
    }

    // BufferedReader 생성자를 Hooking 하여 Frida 검증 우회 (Target : isCheckFridaModule, isCheckFridaPipe)
    if (bufReaderBypass) {
      var BufferedReader = Java.use("java.io.BufferedReader");
      BufferedReader.$init.overload("java.io.Reader", "int").implementation = function (arg1, arg2) {
        try {
          console.log("[*] Hooked java.io.BufferedReader(java.io.Reader) called! [Args:" + arg1 + "]"); //arg1.getClass().getName()
          var fr = Java.use("java.io.FileReader").$new("/dev/null");
          return this.$init(fr, arg2);
        } catch (ex) { console.log("[*] Exception : " + ex); return this.$init(fr, arg2); }
      }
    }

    // Socket 처리를 Hooking 하여 Frida 검증 우회 (Target : isCheckFridaPort)
    if (socketBypass) {
      var Socket = Java.use("java.net.Socket");
      Socket.$init.overload("java.lang.String", "int").implementation = function (addr, port) {
        try {
          if (port >= 27000 && port <= 27042) {
            //console.log("[*] Hooked java.net.Socket(java.lang.String, int) called! [ " + addr + " / " + port + " ]");
            return this.$init(addr, 52525);
          }
          return this.$init(addr, port);
        } catch (ex) { }
      }
      Socket.isConnected.implementation = function () {
        //console.log("[*] Hooked java.net.Socket.isConnected() called!");
        return false;
      }
    }

    // Android 에서는 UI 관련 객체(Context, Handler, View 등)는 main/UI 쓰레드 안에서만 안전하게 사용가능하므로,
    // Java.scheduleOnMainThread() 를 이용해 MainThread 안에서 동작하도록 작성해야 함.
    Java.scheduleOnMainThread(function () {
      try {
        var context = Java.use("android.app.ActivityThread").currentApplication().getApplicationContext();
        var instance = FridaDetector.$new(context);

        var _isCheckFridaBinary = instance.isCheckFridaBinary()
        var _isCheckFridaModule = instance.isCheckFridaModule()
        var _isCheckFridaPipe   = instance.isCheckFridaPipe()
        var _isCheckFridaPort   = instance.isCheckFridaPort()

        console.log("")
        console.log("[*] isCheckFridaBinary() : " + _isCheckFridaBinary);
        console.log("[*] isCheckFridaModule() : " + _isCheckFridaModule);
        console.log("[*] isCheckFridaPipe()   : " + _isCheckFridaPipe);
        console.log("[*] isCheckFridaPort()   : " + _isCheckFridaPort);
        console.log("")

      } catch (ex) { console.log("[*] Exception : " + ex); }
    });
  });
}, 0);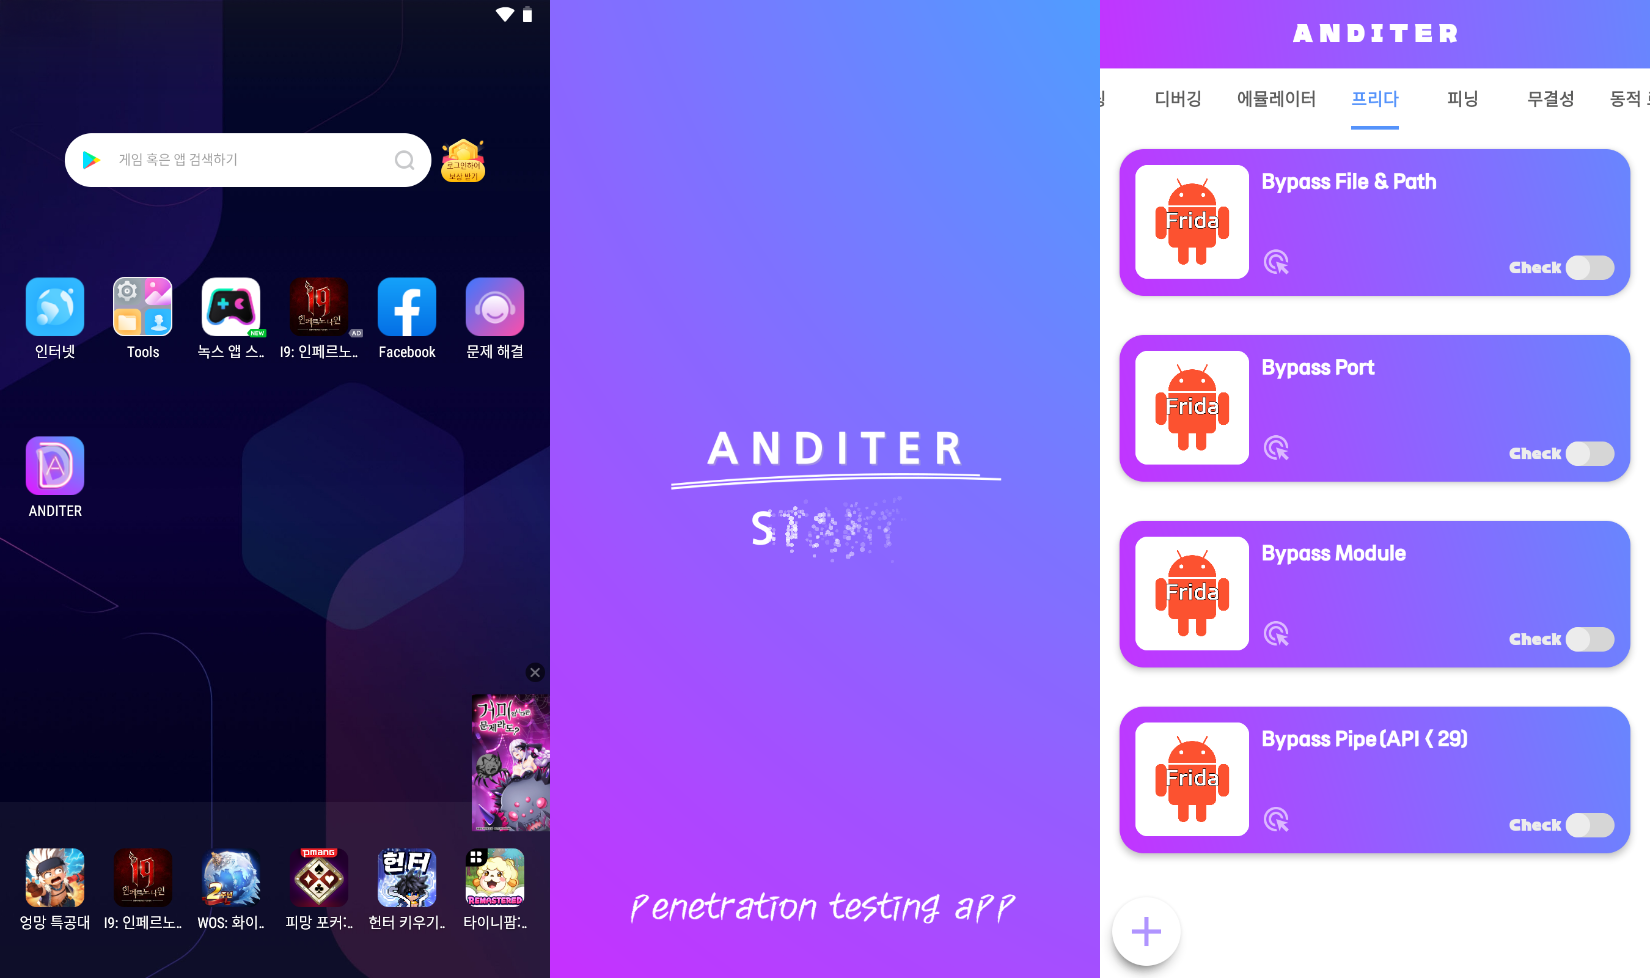
![[서비스분석] OTT Session #01](/content/images/2025/09/Discovery-Blog-hero-image-1-2048x1065.png)


![[How] JAVA Runtime 설치 방법](/content/images/2025/04/JRE-Install-008-1.png)
토론하기